Shopify Shipping: The Complete Guide for E-commerce Stores
Last updated:

Shipping probably wasn’t why you started your Shopify store. You just needed it to work, so you could focus on growing your business.
And at the start, it does. Shopify shipping makes it easy to get started.
But as you grow, things get more complex – fast. And suddenly, the setup that worked fine…starts slowing you down.
That’s where shipping stops being a background task and starts impacting your growth.
In this guide, you’ll learn how Shopify shipping works, where it starts to fall short, and what to do when you hit that point.
All backed by insights from our Shopify experts, Dirk Bothof and Loes Keijsers, who work closely with merchants scaling their shipping operations.
Let’s get started!
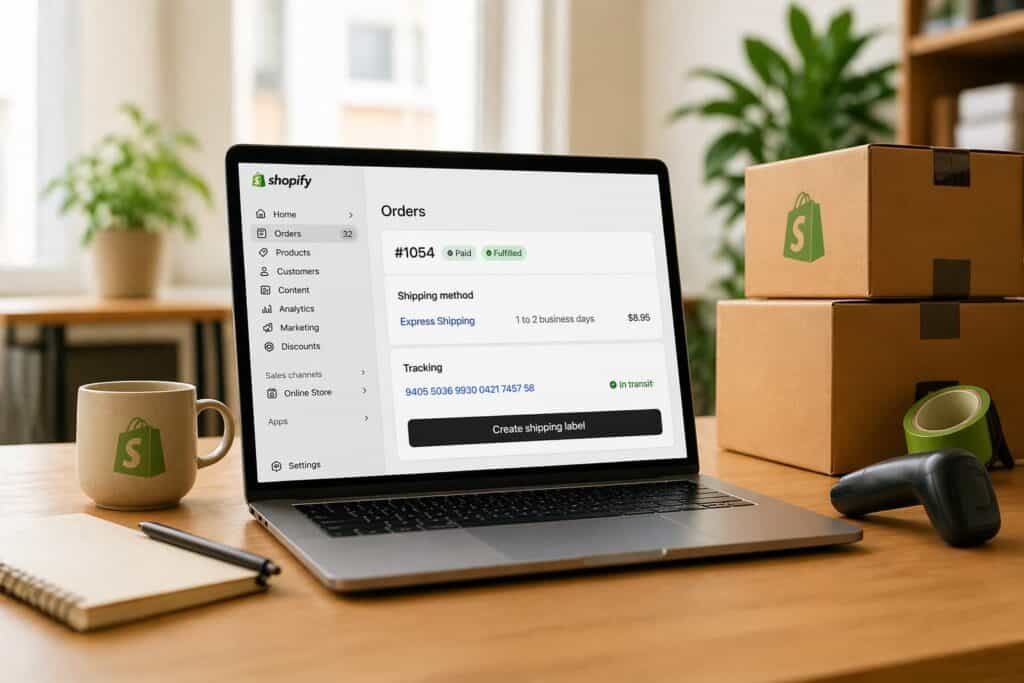
What is Shopify shipping and how does it work?
Shopify shipping is the platform’s built-in functionality that lets you manage delivery directly from your store. And for most merchants, it’s where their shipping journey starts.
It gives you the essentials:
Set shipping rates
Show delivery options at checkout
Create shipping labels
Connect to carriers
Fulfill orders
The flow is simple:
Order → shipping options at checkout → customer selects delivery → label creation → fulfillment
And that simplicity is the whole point. You can start shipping quickly, without needing extra tools or complex setup. For new stores, that’s exactly what you need.
But here’s the catch: Shopify shipping isn’t built for complexity. It’s built to get you started.
It works well when things are still simple:
You’re shipping low volumes (around 1-100 orders per week)
Your delivery setup is straightforward
You rely on one or two carriers
But as your business grows, shipping gets harder to manage.
Shipping stops being something you “set and forget.” It becomes something you need to stay on top of.
Manual work increases, delivery options become harder to coordinate, and customer expectations rise. What started as a simple setup becomes something you need to actively manage.
That’s the turning point for many Shopify merchants: when shipping starts affecting how the business performs.
How to set up Shopify shipping (step-by-step)
Setting up Shopify shipping is relatively easy. Setting it up in a way that actually supports your margins, conversion, and operations? That takes a bit more thought.
“Most merchants don’t want to spend time configuring shipping. They want something that works, so they can focus on marketing, sales, and growing their business.” — Loes Keijsers, Product Manager at Sendcloud
So don’t aim for perfection from day one. Start with something simple that works. And build from there.
Here’s how:
Step 1: set up shipping zones
Before you define your shipping zones, make sure your product and package details are set up correctly.
This includes things like: Product weight, parcel dimensions, shipping origin
Without this, Shopify can’t calculate accurate shipping rates. Once that’s in place, you can define your shipping zones.
Shipping zones define where you ship and how your rates apply.
You can group:
Individual countries
Regions (e.g. within or outside Europe)
Or multiple markets with similar pricing
A clear zone setup helps you avoid unexpected costs and keeps your pricing consistent across markets.
💡 Tip: Base your zones on actual shipping costs, not just geography.
Step 2: configure shipping rates
Shopify lets you choose how you charge for shipping:
Flat rates
Weight-based rates
Price-based rates
At this stage, focus on creating a structure that is easy to manage. Keep it simple.
Start with:
A standard domestic rate
A clear international rate
A free shipping threshold for higher-value orders
“Many merchants compare carriers on label price first, but the real cost shows up later – in missed delivery expectations, extra support work, and lower repeat purchase.” – Dirk Bothof, Product Lead at Sendcloud
Free shipping isn’t just a cost; it’s a lever! Set the threshold right, and customers will add more to their cart to reach it.
💡 Don’t overcomplicate this. You can refine it later.
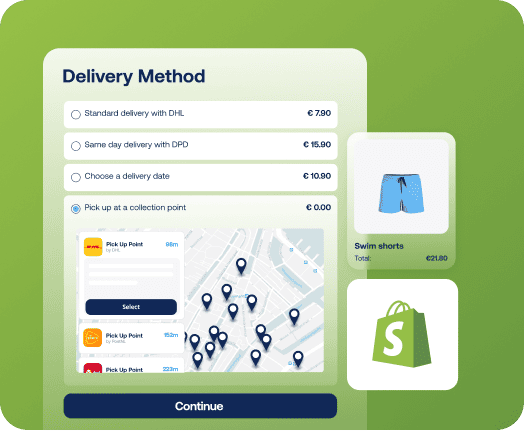
Step 3: add shipping methods
Shipping methods are what customers actually see at checkout.
Typical options:
Standard delivery
Express delivery
Service point / pickup delivery
Start with a small set of relevant options that match your main markets.
“Setting up service points is often more complex than merchants expect. It’s a detailed step, but an important one – especially in markets like France, where customers actively prefer pickup locations over home delivery.” — Loes Keijsers, Product Manager at Sendcloud
Many merchants underestimate how important it is to match delivery methods to each market. What works in one country won’t always work in another. If you offer the wrong options, you’ll see it in your conversion.
💡 Choose options based on how customers prefer to receive parcels in each market.
Check out our E-Commerce Delivery Compass to find out how consumer preferences differ per market across countries!
And read on to learn more about how to nail Shopify shipping options!
Step 4: add carriers
Most merchants pick one or two carriers and move on. That’s fine at the start. But it comes with trade-offs:
No flexibility per destination
No way to optimize cost vs performance
No backup when things go wrong
“Many merchants choose carriers based on what they know or what seems cheapest, without looking at which carrier actually performs best per destination.” – Dirk Bothof, Product Lead at Sendcloud
💡 Relying on a single carrier is simple. But it’s rarely the best long-term setup.
Step 5: fulfill orders and print labels
Once orders come in, the process is straightforward:
Select a shipping method
Create a label
Fulfill the order
This is where manual work starts to creep in. At low volume, it’s manageable. At higher volume, it becomes a bottleneck.
“Manually selecting shipping methods might work at the start, but it quickly becomes one of the biggest time drains as volume increases.” — Loes Keijsers, Product Manager at Sendcloud
The fix? Automation.
With shipping rules, you can automatically assign the right carrier based on checkout choices or order data.
💡 Once this is set up, the next challenge is making it efficient – and scalable.
Depending on your product and markets, you may also need to consider:
Insurance for higher-value shipments
Age verification (e.g. 18+ delivery for restricted products)
Market-specific delivery requirements
Most merchants ignore these early on. But they become important fast once you scale.
Shopify shipping options explained
The Shopify delivery options you show at checkout do more than define how you ship. They influence whether a customer completes their order-or leaves.
Most merchants think in logistics. Customers think in convenience, speed, and control.
That’s where the difference is made.
Not every delivery option matters equally. What works depends on your market, your product, and what your customers expect.
Delivery option | What it offers | When it works best | Impact on conversion | Expert note |
|---|---|---|---|---|
Standard delivery | Lower cost, longer delivery time | Price-sensitive customers | Expected baseline | This is your default, but rarely your differentiator. |
Express shipping | Faster delivery (next day or 1-2 days) | Urgent or last-minute purchases | Strong conversion boost | If customers need something urgently and you don’t offer this, they’ll look elsewhere. |
Same-day / next-day | Very fast delivery | Competitive markets with high expectations | Increasingly expected by customers | Fast delivery is no longer a luxury, it’s becoming the standard in many categories. |
Service point / pickup | Flexible pickup locations | Markets like France, urban areas | High impact when expected | In markets like France, service points are essential. Without them, you’re likely losing customers at checkout. |
More delivery options don’t automatically improve conversion. What matters is offering the right options for your market and product.
For example:
Service points are essential in some countries (like France), but less important in others
Fast delivery matters more for urgent purchases than for low-consideration products
Bulky or high-value items often need different delivery methods than small parcels
That’s why the best-performing stores focus on relevance, not volume.
Common mistakes:
Offering only one delivery method
Ignoring market-specific preferences
Not showing clear delivery times
Treating shipping as a cost, not a choice
💡 The best-performing Shopify stores do the opposite:
Offer multiple, relevant delivery options (not just more)
Adapt options per market and product type
Make delivery clear and predictable
More delivery choice gives customers confidence and increases the likelihood they complete their purchase – but only when those choices match what customers actually expect.
Shopify shipping rates and costs explained
Shipping rates affect your margins and your conversion. In Shopify, they’re usually based on parcel weight, shipping zones, delivery method, and carrier pricing.
Common mistakes:
Offering free shipping without protecting margins
Using the same rates for every region
Not aligning pricing with real shipping costs
“Many merchants focus on the price per shipment, but overlook the total cost of shipping and carrier performance.” – Dirk Bothof, Product Lead at Sendcloud
That total cost of shipping includes more than the label itself. Delays, failed deliveries, support workload, and repeat purchase impact all play a role.
A few adjustments can already improve performance:
Set a free shipping threshold that supports your margins
Adjust rates by region
Review your rates regularly as carrier costs and performance change
Want to go deeper? We break this down step-by-step in our dedicated guide to Shopify shipping rates.
Common Shopify shipping problems (and how to fix them)
Most Shopify shipping problems show up gradually.
A new market adds complexity. A second carrier adds more decisions. Service point delivery needs extra setup. Over time, the workarounds start piling up.
Here are the most common issues merchants run into – and how to fix them.
These challenges are common as your business grows. Shopify works well when your setup is still straightforward. But as complexity increases, your shipping setup needs to evolve with it.
Where Shopify shipping works – and where it breaks
Shopify shipping does exactly what it’s meant to do: help merchants start shipping quickly and keep things simple in the early stages.
For many stores, that’s all you need in the beginning.
Where Shopify shipping works well
Shopify shipping is a strong fit when your setup is still simple.
It works best when:
You’re just getting started
You’re shipping relatively low volumes (e.g. a few orders per day)
You’re mostly shipping domestically
You rely on one or two carriers
You offer a limited number of delivery options
At this stage, speed and simplicity matter most.
You can set up rates, create labels, and fulfill orders without adding extra tools or complexity.
In other words: Shopify works best when things are easy to manage.

Where challenges start to appear
As your business grows, shipping requirements change.
“Shipping is never something you fully ‘set and forget.’ Costs change, carriers change, and your setup needs to evolve with your business.” – Dirk Bothof, Product Lead at Sendcloud
In practice, the first issues don’t show up everywhere at once. They usually appear in specific areas first:
Service point delivery becomes harder to set up and manage
Managing multiple carriers becomes time-consuming
International shipping introduces complexity around customs, product data, and local delivery expectations
Manual processes take up more time
Delivery expectations become harder to meet consistently
This is where Shopify’s simplicity starts to work against you.
International shipping is often the tipping point. It’s not just about shipping further, you need to handle customs, manage product data, and choose the right carriers per country.
The real shift
The change is less about volume alone and more about complexity.
As soon as you add multiple carriers, international delivery, or market-specific checkout options, shipping requires more coordination and control.
That’s the point where many merchants start looking beyond a basic setup.
“Shipping starts as an operational task, but quickly becomes part of your customer experience and growth strategy.” — Loes Keijsers, Product Manager at Sendcloud
Your setup needs to support that shift!
Shopify shipping vs shipping platforms
As your shipping setup becomes more complex, many merchants start looking beyond Shopify’s native functionality.
Not to replace Shopify – but to build on top of it.
Shipping platforms sit on top of Shopify and add the flexibility, automation, and visibility that growing businesses need. They integrate directly with your Shopify store, so you can extend your shipping setup without changing how you sell.
So you can improve your shipping setup, without changing how you sell.
Most merchants don’t switch because they suddenly need more features.
More often, they reach a point where shipping involves too many manual decisions, too many disconnected tools, and too many exceptions to handle. What used to work… starts to feel messy.
At that point, the real challenge is consistency and control.
Capability | Shopify shipping | Shipping platforms (e.g. Sendcloud) |
|---|---|---|
Carrier access | Limited (region-dependent) | Multi-carrier (100+ options) |
Automation | Basic | Advanced workflows and rules |
Checkout experience | Limited customization | Flexible delivery options |
Out-of-home delivery | Limited availability | 400k+ pickup points & lockers |
Tracking | Basic updates | Branded, proactive communication |
Returns | Manual processes | Self-service returns |
Support handling | Manual | Automated workflows |
Insights & analytics | Limited visibility | Performance tracking and cost insights |
As shipping grows more complex, the main difference is coordination.
A shipping platform helps you manage checkout options, carrier selection, tracking, returns, and support workflows in one system — including pickup point and parcel locker delivery, which many Shopify merchants can’t easily offer through native Shopify shipping alone.
It also makes shipping data more useful across the business, so teams have better visibility and customers get clearer communication.
“Shipping evolves from a basic setup into a connected system across checkout, fulfillment, delivery, and support.” — Loes Keijsers, Product Manager at Sendcloud
Shopify gives you a strong foundation. Shipping platforms add the layer you need to manage complexity, with more consistency, visibility, and control.
How to optimize Shopify shipping for growth
Once your shipping setup is in place, the next step is improving how it performs.
As you grow, things get more complex. More orders. More expectations. Less room for error.
The best way to handle that?
Look at your full shipping journey-from checkout to delivery and beyond.
1. Optimize checkout (increase conversion)
Checkout is where customers decide how they want their order delivered.
Customers want:
Clear delivery options
Transparent delivery times
Flexibility in how they receive their order
Small gaps here can lead to abandoned carts.
“Unclear delivery guarantees are one of the fastest ways to lose a customer at checkout.” – Dirk Bothof, Product Lead at Sendcloud
What helps:
Offer multiple delivery options (standard, express, service point)
Show clear delivery timeframes
Adapt delivery options per market
Make your checkout flexible enough to support these options. Using the right Shopify checkout apps can help here!
2. Automate fulfillment (save time and reduce errors)
Fulfillment is often the first thing that breaks as volume grows.
Manual steps slow teams down and increase the risk of mistakes:
Selecting shipping methods
Creating labels
Assigning carriers
What helps:
Automate carrier selection with shipping rules
Standardize fulfillment workflows
3. Improve the delivery experience
Delivery is where customers judge your reliability. If they don’t know what’s happening, they’ll reach out.
Many stores still rely on reactive support, waiting for WISMO questions to come in.
The biggest win is shifting to proactive communication.
What helps:
Send tracking updates automatically
Provide real-time delivery status
Communicate delays clearly
This improves the customer experience-and reduces support pressure. Read more about the post-purchase experience in our guide!
4. Simplify returns (improve customer experience)
Returns are part of the customer journey, especially in industries like fashion.
If the process is unclear or manual, it creates friction for everyone – and often lacks visibility into what’s actually happening.
What helps:
Provide clear return instructions upfront
Offer a simple return flow (e.g. portal or QR-based process)
Keep return status visible and trackable
A structured Shopify returns process also gives you better insight into return reasons and patterns – which can help improve both operations and product decisions.

5. Reduce support workload
As order volume grows, support requests increase – especially around delivery. Without visibility, teams rely on manual checks and communication.
In many growing stores, delivery issues are handled across multiple channels – email inboxes, support tools, and internal notes. This makes it difficult to track issues, follow up on claims, or spot recurring problems.
What helps:
Centralize shipping and tracking information
Automate customer updates and notifications
Track issues like delays, failed deliveries, and claims in one place
Reduce the need for manual follow-up
The goal is simple: fix issues before they turn into support tickets.
6. Use shipping data to improve performance
As you scale, shipping becomes a valuable source of insight.
With the right visibility, you can:
Track carrier performance per route or market
Identify where delays or delivery failures occur
Monitor support volume and recurring issues
Spot cost inefficiencies or shipping leakage
This data improves your shipping AND supports the wider business.
For example:
Customer support teams can resolve issues faster
Marketing and CRM tools can use delivery updates in customer communication
Operations teams can optimize processes based on real performance
The bigger picture matters when optimizing Shopify shipping
Every step in the shipping journey is connected.
Better checkout → higher conversion
Smarter fulfillment → fewer errors
Clear communication → fewer support tickets
Optimizing Shopify shipping works best when you look at the full journey, rather than fixing each part in isolation.
Best Shopify shipping setup by business size
The right shipping setup depends on where your business is today.
As order volume increases, shipping quickly becomes more complex – but more importantly, your priorities change.
For small Shopify stores (0-1k orders/month)
At this stage, your focus is simple: growth.
Shipping should be:
Affordable
Easy to manage
Quick to set up
You’re likely juggling multiple parts of your business at once – marketing, orders, support – so shipping shouldn’t slow you down.
“Merchants at this stage want to focus on growth, not on managing shipping setup.” — Loes Keijsers, Product Manager at Sendcloud
What a good setup looks like:
A domestic rate with a free shipping threshold
International rates per country
A small set of delivery options (standard + express)
Service point delivery where market-relevant
Multiple carriers to balance cost and performance
Basic automation where possible
“Free shipping isn’t just a pricing tactic – it’s a way to increase order value. Merchants often see customers add more to their cart just to reach the threshold.” — Loes Keijsers, Product Manager at Sendcloud
What to focus on
Keeping shipping costs low and predictable
Avoiding unnecessary complexity
Setting up a structure you can build on later
For scaling brands (1k+ orders/month)
As volume grows, priorities start to shift.
At this stage, it’s no longer just about cheap shipping – it’s about reliability and control.
The cheapest option isn’t always the best one. Delivery success rate becomes more important, because failed deliveries, delays, and exceptions quickly turn into support costs and lost revenue.
“An issue that affects just 1% of shipments doesn’t seem like much – until you’re shipping at scale and dealing with it every single day.” – Dirk Bothof
What a good setup looks like:
A multi-carrier strategy across different markets
Automated workflows (e.g. carrier selection, label creation)
Multiple, market-relevant delivery options at checkout
Structured tracking and proactive communication
A clear, scalable returns process
What to focus on
Reducing manual decision-making
Improving delivery consistency and success rate
Gaining visibility into costs, performance, and issues
Connecting shipping with the rest of your stack (support, CRM, marketing tools)
Automation becomes critical at this stage – not just to save time, but because your team can’t scale linearly with order volume.
Your setup needs to support that shift!
Checklist: Signs you’ve outgrown your current Shopify shipping setup
You’ll usually feel it before you see it clearly. Common signs:
You’re using multiple carriers and managing them manually
You’re shipping internationally and running into complexity (e.g. customs, product data, different delivery expectations)
Your team spends hours on label creation, fulfillment, or support
Delivery issues and support tickets are increasing
You don’t have clear visibility into shipping costs or carrier performance
In reality, it often shows up in smaller ways first:
Your shipping setup is spread across different tools, apps, and spreadsheets
Customer questions and delivery issues are handled through email inboxes or manual checks
You’re dealing with more exceptions – failed deliveries, delays, special cases – that require manual handling
International shipments take more time than expected due to missing data or unclear processes
“Complexity rarely shows up as one big problem. It’s usually a build-up of small workarounds – another carrier here, a manual rule there, a spreadsheet to fill the gap – until the whole setup becomes hard to manage.” – Dirk Bothof, Product Lead at Sendcloud
What changes when you upgrade
Upgrading your shipping setup gives you more structure and control across your operations.
Instead of managing tasks and exceptions manually, you start to standardize how things work.
That means you can:
Automate repetitive tasks and reduce manual work
Manage multiple carriers in one place
Offer more flexible delivery options at checkout
Improve tracking and communication
Gain insight into performance and costs
The result is fewer decisions, fewer exceptions, and more control as you grow.
How Sendcloud helps you manage Shopify shipping at scale
As shipping gets more complex, most merchants start adding tools around Shopify. A carrier here. A tracking tool there. Maybe a return solution-or a spreadsheet to tie it all together.
That’s when things start to fragment.
Sendcloud brings those parts back together into one system.

Unlike Shopify, which is designed to help you sell, Sendcloud is built specifically to manage and optimize your shipping operations as they grow.
Instead of managing carriers, labels, tracking, and returns separately, you can centralize them in one workflow and automate more of the decisions behind them.
“Many merchants end up juggling multiple tools and manual steps. Bringing that into one flow saves a huge amount of time.” — Loes Keijsers, Product Manager at Sendcloud
This becomes especially valuable as you grow. You can adapt delivery options per market, work with multiple carriers, reduce manual handling, and use shipping data across support, marketing, and customer communication.
The result is simple: A setup that’s easier to manage day to day-and easier to scale as you grow.
Sendcloud builds on Shopify’s foundation, so you can turn shipping into a strength, not a bottleneck.
Conclusion: from shipping setup to shipping strategy
Shopify gives you a solid foundation to start shipping.
As your business grows, the challenge shifts from getting orders out the door to managing shipping with consistency and control.
That’s where a more connected setup makes the difference.
If you’re starting to feel that shift, it’s a good moment to rethink your setup.

Author and researcher
As Global Content Manager at Sendcloud, Johanna leads content strategy across e-commerce, logistics, and shipping automation. With a background in B2B SaaS and a passion for clear communication, she creates educational resources that help over 30,000 online stores optimize and scale their shipping operations.

Subject matter expert
Partner Marketing Manager at Sendcloud, Clíodhna shares valuable industry insights from top e-commerce experts.
How much time can you save on shipping?
Share

Recommended For You

Shipping
Shopify shipping rates and costs explained (+ how to reduce costs)
Learn how Shopify shipping rates work, compare pricing methods, and discover practical ways to reduce shipping costs and protect margins.

Consumer trends in e-commerce 2026: What European shoppers really want
We surveyed 8,000 European shoppers to map the biggest consumer trends in e-commerce, from checkout to post-purchase, loyalty, and returns.
Shipping
Shopify Shipping: The Complete Guide for E-commerce Stores
Learn how Shopify shipping works, how to set it up, and how to optimize costs, delivery options, and performance as your store grows.